


自定义 Web 客户端
危险
本教程已过时。
本指南是关于为 Odoo 的 Web 客户端创建模块的。
要使用 Odoo 创建网站,请参阅 建立网站主题;要添加业务功能或扩展 Odoo 的现有业务系统,请参阅:doc:backend。
一个简单的模块
让我们从一个简单的 Odoo 模块开始,该模块包含基本的 Web 组件配置并让我们测试 Web 框架。
该示例模块可在线获取,并且可以使用以下命令下载:
$ git clone http://github.com/odoo/petstore
这将创建一个“petstore` folder wherever you executed the command. You then need to add that folder to Odoo’s addons path, create a new database and install the ``oepetstore`”模块。
如果您浏览“petstore”文件夹,您应该看到以下内容:
oepetstore
|-- images
|   |-- alligator.jpg
|   |-- ball.jpg
|   |-- crazy_circle.jpg
|   |-- fish.jpg
|   `-- mice.jpg
|-- __init__.py
|-- oepetstore.message_of_the_day.csv
|-- __manifest__.py
|-- petstore_data.xml
|-- petstore.py
|-- petstore.xml
`-- static
    `-- src
        |-- css
        |   `-- petstore.css
        |-- js
        |   `-- petstore.js
        `-- xml
            `-- petstore.xml
该模块已经包含各种服务器定制。我们稍后会再讨论这些内容,现在让我们重点关注“static”文件夹中与网络相关的内容。
Odoo 模块“web”端使用的文件必须放置在 static folder so they are available to a web browser, files outside that folder can not be fetched by browsers. The src/css, src/js and src/xml 子文件夹中,这是常规做法,并非绝对必要。
oepetstore/static/css/petstore.css当前为空,将保存宠物商店内容的 CSS
oepetstore/static/xml/petstore.xml大部分是空的,将容纳 QWeb 模板 模板
oepetstore/static/js/petstore.js最重要(也是最有趣)的部分,包含应用程序(或至少其网络浏览器端)的 JavaScript 逻辑。目前它应该看起来像:
odoo.oepetstore = function(instance, local) {
    var _t = instance.web._t,
        _lt = instance.web._lt;
    var QWeb = instance.web.qweb;

    local.HomePage = instance.Widget.extend({
        start: function() {
            console.log("pet store home page loaded");
        },
    });

    instance.web.client_actions.add(
        'petstore.homepage', 'instance.oepetstore.HomePage');
}
它只在浏览器的控制台中打印一条小消息。
static folder, need to be defined within the module in order for them to be loaded correctly. Everything in src/xml is defined in __manifest__.py while the contents of src/css and src/js are defined in petstore.xml 中的文件或类似文件。
警告
所有 JavaScript 文件均串联并使用 minified 以缩短应用程序加载时间。
缺点之一是调试变得更加困难,因为单个文件消失并且代码的可读性显着降低。可以通过启用“开发者模式”来禁用此过程:登录您的 Odoo 实例(默认用户 admin 密码 admin)打开用户菜单(位于 Odoo 屏幕的右上角)并选择 About Odoo 然后选择 Activate the developer mode:
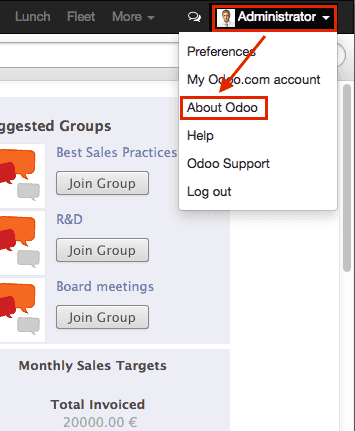
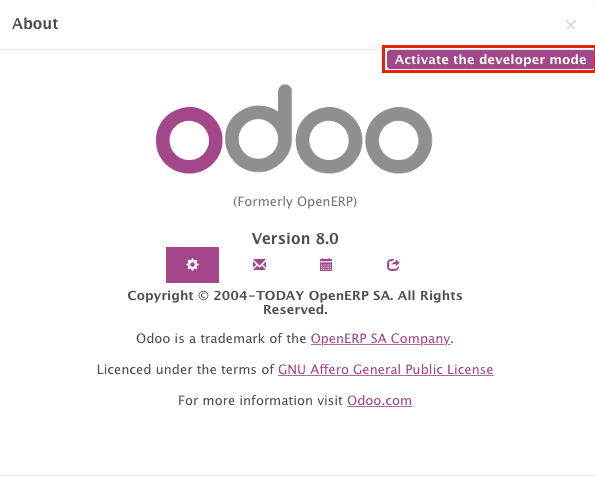
这将在禁用优化的情况下重新加载 Web 客户端,从而使开发和调试变得更加舒适。
Odoo JavaScript 模块
Javascript 没有内置模块。因此,不同文件中定义的变量都混在一起,可能会发生冲突。这催生了各种模块模式,用于构建干净的命名空间并限制命名冲突的风险。
Odoo 框架使用一种这样的模式来定义 Web 插件中的模块,以便命名空间代码并正确排序其加载。
oepetstore/static/js/petstore.js 包含一个模块声明:
odoo.oepetstore = function(instance, local) {
    local.xxx = ...;
}
在 Odoo web 中,模块被声明为全局 odoo variable. The function’s name must be the same as the addon (in this case oepetstore 上设置的函数,因此框架可以找到它,并自动初始化它。
当 Web 客户端加载您的模块时,它将调用 root 函数并提供两个参数:
第一个参数是 Odoo Web 客户端的当前实例,它允许访问 Odoo 定义的各种功能(翻译、网络服务)以及核心或其他模块定义的对象。
第二个参数是 Web 客户端自动创建的您自己的本地命名空间。应可从模块外部访问的对象和变量(因为 Odoo Web 客户端需要调用它们或因为其他人可能想要自定义它们)应设置在该名称空间内。
课程
就像模块一样,与大多数面向对象的语言相反,javascript 并不构建在 classes1 中,尽管它提供了大致等效的(如果是较低级别和更详细的)机制。
为了简单性和开发人员友好性,Odoo web 提供了一个基于 John Resig 的 Simple JavaScript Inheritance 的类系统。
新类是通过调用 odoo.web.Class():: 的 extend() 方法来定义的
var MyClass = instance.web.Class.extend({
    say_hello: function() {
        console.log("hello");
    },
});
extend() 方法采用一个描述新类内容(方法和静态属性)的字典。在这种情况下,它只有一个不带参数的“say_hello”方法。
类是使用“new”运算符实例化的:
var my_object = new MyClass();
my_object.say_hello();
// print "hello" in the console
并且可以通过``this``访问实例的属性:
var MyClass = instance.web.Class.extend({
    say_hello: function() {
        console.log("hello", this.name);
    },
});

var my_object = new MyClass();
my_object.name = "Bob";
my_object.say_hello();
// print "hello Bob" in the console
类可以通过定义 init() method. The initializer receives the parameters passed when using the new 运算符来提供初始化程序来执行实例的初始设置:
var MyClass = instance.web.Class.extend({
    init: function(name) {
        this.name = name;
    },
    say_hello: function() {
        console.log("hello", this.name);
    },
});

var my_object = new MyClass("Bob");
my_object.say_hello();
// print "hello Bob" in the console
还可以通过在父类上调用 extend() 从现有(使用定义的)类创建子类,就像对子类 Class() 所做的那样:
var MySpanishClass = MyClass.extend({
    say_hello: function() {
        console.log("hola", this.name);
    },
});

var my_object = new MySpanishClass("Bob");
my_object.say_hello();
// print "hola Bob" in the console
当使用继承重写方法时,可以使用``this._super()``来调用原始方法:
var MySpanishClass = MyClass.extend({
    say_hello: function() {
        this._super();
        console.log("translation in Spanish: hola", this.name);
    },
});

var my_object = new MySpanishClass("Bob");
my_object.say_hello();
// print "hello Bob \n translation in Spanish: hola Bob" in the console
警告
_super is not a standard method, it is set on-the-fly to the next
method in the current inheritance chain, if any. It is only defined
during the synchronous part of a method call, for use in asynchronous
handlers (after network calls or in setTimeout callbacks) a reference
to its value should be retained, it should not be accessed via this:
// broken, will generate an error
say_hello: function () {
    setTimeout(function () {
        this._super();
    }.bind(this), 0);
}

// correct
say_hello: function () {
    // don't forget .bind()
    var _super = this._super.bind(this);
    setTimeout(function () {
        _super();
    }.bind(this), 0);
}
小部件基础知识
Odoo Web 客户端捆绑了 jQuery 以方便 DOM 操作。它很有用,并提供了比标准 W3C DOM2 更好的 API,但不足以构建复杂的应用程序,导致维护困难。
与面向对象的桌面 UI 工具包(例如 Qt、Cocoa 或 GTK)非常相似,Odoo Web 使特定组件负责页面的各个部分。在 Odoo web 中,此类组件的基础是 Widget() 类,该组件专门用于处理页面部分并为用户显示信息。
你的第一个小部件
初始演示模块已经提供了一个基本的小部件::
local.HomePage = instance.Widget.extend({
    start: function() {
        console.log("pet store home page loaded");
    },
});
它扩展了 Widget() 并覆盖了标准方法 start(),该方法与之前的 MyClass 非常相似,目前几乎没有什么作用。
文件末尾的这一行:
instance.web.client_actions.add(
    'petstore.homepage', 'instance.oepetstore.HomePage');
将我们的基本小部件注册为客户端操作。稍后将解释客户端操作,目前这只是当我们选择 菜单时允许调用和显示我们的小部件的操作。
警告
因为该小部件将从我们的模块外部调用,所以 Web 客户端需要其“完全限定”名称,而不是本地版本。
显示内容
小部件有许多方法和功能,但基础知识很简单:
设置一个小部件
格式化小部件的数据
显示小部件
HomePage 小部件已经有一个 start() 方法。该方法是正常小部件生命周期的一部分,一旦小部件插入页面就会自动调用。我们可以用它来显示一些内容。
所有小部件都有一个 $el ,它代表它们负责的页面部分(作为 jQuery 对象)。小部件内容应该插入那里。默认情况下,$el 是一个空的 <div> 元素。
启动“<div>` element is usually invisible to the user if it has no content (or without specific styles giving it a size) which is why nothing is displayed on the page when ``HomePage`”。
让我们使用 jQuery:: 添加一些内容到小部件的根元素中
local.HomePage = instance.Widget.extend({
    start: function() {
        this.$el.append("<div>Hello dear Odoo user!</div>");
    },
});
当您打开 时,该消息就会出现
注解
要刷新 Odoo Web 中加载的 javascript 代码,您需要重新加载页面。无需重新启动 Odoo 服务器。
HomePage 小部件由 Odoo Web 使用并自动管理。要学习如何“从头开始”使用小部件,让我们创建一个新的小部件::
local.GreetingsWidget = instance.Widget.extend({
    start: function() {
        this.$el.append("<div>We are so happy to see you again in this menu!</div>");
    },
});
我们现在可以添加 GreetingsWidget to the HomePage by using the GreetingsWidget 的 appendTo() 方法:
local.HomePage = instance.Widget.extend({
    start: function() {
        this.$el.append("<div>Hello dear Odoo user!</div>");
        var greeting = new local.GreetingsWidget(this);
        return greeting.appendTo(this.$el);
    },
});
HomePage首先将它自己的内容添加到它的 DOM 根中HomePagethen instantiatesGreetingsWidget最后它告诉“
GreetingsWidget`where to insert itself, delegating part of its$elto the ``GreetingsWidget`”。
当调用 appendTo() 方法时,它会要求小部件将自身插入到指定位置并显示其内容。 start() 方法将在调用 appendTo() 期间被调用。
为了查看显示界面下发生了什么,我们将使用浏览器的 DOM Explorer。但首先让我们稍微改变一下我们的小部件,这样我们就可以更容易地找到它们的位置,通过 adding a class to their root elements:
local.HomePage = instance.Widget.extend({
    className: 'oe_petstore_homepage',
    ...
});
local.GreetingsWidget = instance.Widget.extend({
    className: 'oe_petstore_greetings',
    ...
});
如果您可以找到 DOM 的相关部分(右键单击文本,然后 Inspect Element),它应该如下所示:
<div class="oe_petstore_homepage">
    <div>Hello dear Odoo user!</div>
    <div class="oe_petstore_greetings">
        <div>We are so happy to see you again in this menu!</div>
    </div>
</div>
它清楚地显示了 Widget() 自动创建的两个 <div>` 元素,因为我们在它们上添加了一些类。
我们还可以看到我们自己添加的两个消息持有div
最后,请注意``<div class=”oe_petstore_greetings”>`` element which represents the GreetingsWidget instance is inside the <div class="oe_petstore_homepage"> which represents the ``HomePage``实例,因为我们附加了
小部件父母和孩子
在上一部分中,我们使用以下语法实例化了一个小部件:
new local.GreetingsWidget(this);
第一个参数是 this, which in that case was a HomePage 实例。这告诉正在创建的小部件哪个其他小部件是它的*父级*。
正如我们所看到的,小部件通常由另一个小部件插入到 DOM 中,并且插入到其他小部件的根元素的“内部”。这意味着大多数小部件是另一个小部件的“一部分”,并代表它而存在。我们将容器称为“父级”,将所包含的小部件称为“子级”。
由于多种技术和概念原因,小部件有必要知道谁是其父级,谁是其子级。
getParent()可用于获取小部件的父级:
local.GreetingsWidget = instance.Widget.extend({
    start: function() {
        console.log(this.getParent().$el );
        // will print "div.oe_petstore_homepage" in the console
    },
});
getChildren()可用于获取其子级的列表:
local.HomePage = instance.Widget.extend({
    start: function() {
        var greeting = new local.GreetingsWidget(this);
        greeting.appendTo(this.$el);
        console.log(this.getChildren()[0].$el);
        // will print "div.oe_petstore_greetings" in the console
    },
});
当重写小部件的 init() 方法时,将父级传递给 this._super()` 调用是*最重要的*,否则关系将无法正确设置:
local.GreetingsWidget = instance.Widget.extend({
    init: function(parent, name) {
        this._super(parent);
        this.name = name;
    },
});
最后,如果一个小部件没有父级(例如,因为它是应用程序的根小部件),则可以提供“null”作为父级:
new local.GreetingsWidget(null);
销毁小部件
如果您可以向用户显示内容,那么您也应该能够删除它。这是通过 destroy() 方法完成的:
greeting.destroy();
当一个小部件被销毁时,它将首先对其所有子部件调用 destroy() 。然后它从 DOM 中删除自己。如果您在 init() 或 start() 中设置了必须显式清理的永久结构(因为垃圾收集器不会处理它们),则可以覆盖 destroy()。
危险
当覆盖 destroy() 时,_super() *必须始终*被调用,否则即使没有显示错误,小部件及其子部件也不会被正确清理,留下可能的内存泄漏和“幻像事件”
QWeb 模板引擎
在上一节中,我们通过直接操作(并添加)它们的 DOM 来向小部件添加内容:
this.$el.append("<div>Hello dear Odoo user!</div>");
这允许生成和显示任何类型的内容,但在生成大量 DOM 时会变得笨拙(大量重复、引用问题……)
与许多其他环境一样,Odoo 的解决方案是使用 template engine。 Odoo 的模板引擎称为 QWeb 模板。
QWeb 是一种基于 XML 的模板语言,类似于 Genshi、Thymeleaf 或 Facelets。它具有以下特点:
它完全用 JavaScript 实现并在浏览器中呈现
每个模板文件(XML文件)包含多个模板
它在 Odoo Web 的
Widget()中具有特殊支持,尽管它可以在 Odoo 的 Web 客户端之外使用(并且可以在不依赖 QWeb 的情况下使用Widget())
注解
使用 QWeb 而不是现有的 javascript 模板引擎的基本原理是预先存在的(第三方)模板的可扩展性,就像 Odoo views 一样。
大多数 javascript 模板引擎都是基于文本的,这妨碍了简单的结构可扩展性,其中基于 XML 的模板引擎通常可以使用例如XPath 或 CSS 以及树更改 DSL(甚至只是 XSLT)。这种灵活性和可扩展性是 Odoo 的核心特征,失去它被认为是不可接受的。
使用 QWeb
首先让我们在几乎空的 oepetstore/static/src/xml/petstore.xml 文件中定义一个简单的 QWeb 模板:
<?xml version="1.0" encoding="UTF-8"?>
<templates xml:space="preserve">
    <t t-name="HomePageTemplate">
        <div style="background-color: red;">This is some simple HTML</div>
    </t>
</templates>
现在我们可以在页面顶部定义的``HomePage`` widget. Using the ``QWeb``加载器变量中使用这个模板,我们可以调用XML文件中定义的模板:
local.HomePage = instance.Widget.extend({
    start: function() {
        this.$el.append(QWeb.render("HomePageTemplate"));
    },
});
QWeb.render() 查找指定的模板,将其呈现为字符串并返回结果。
但是,由于 Widget() 对 QWeb 有特殊集成,因此可以通过其 template 属性直接在小部件上设置模板:
local.HomePage = instance.Widget.extend({
    template: "HomePageTemplate",
    start: function() {
        ...
    },
});
尽管结果看起来相似,但这些用法之间有两个区别:
对于第二个版本,模板在调用
start()之前渲染在第一个版本中,模板的内容被添加到小部件的根元素中,而在第二个版本中,模板的根元素直接*设置为*小部件的根元素。这就是为什么“问候”子小部件也有红色背景的原因
警告
模板应该有一个非``t``根元素,特别是如果它们被设置为小部件的:attr:~odoo.Widget.template。如果有多个“根元素”,结果是未定义的(通常只使用第一个根元素,其他根元素将被忽略)
QWeb 上下文
QWeb 模板可以被赋予数据并且可以包含基本的显示逻辑。
对于对 QWeb.render() 的显式调用,模板数据作为第二个参数传递:
QWeb.render("HomePageTemplate", {name: "Klaus"});
将模板修改为:
<t t-name="HomePageTemplate">
    <div>Hello <t t-esc="name"/></div>
</t>
将导致:
<div>Hello Klaus</div>
使用 Widget() 的集成时,无法向模板提供附加数据。该模板将被赋予一个“widget”上下文变量,引用在调用 start() 之前渲染的小部件(小部件的状态本质上是由 init() 设置的):
<t t-name="HomePageTemplate">
    <div>Hello <t t-esc="widget.name"/></div>
</t>
local.HomePage = instance.Widget.extend({
    template: "HomePageTemplate",
    init: function(parent) {
        this._super(parent);
        this.name = "Mordecai";
    },
    start: function() {
    },
});
结果:
<div>Hello Mordecai</div>
模板声明
我们已经了解了如何“渲染”QWeb 模板,现在让我们看看模板本身的语法。
QWeb 模板由常规 XML 与 QWeb 指令 混合组成。 QWeb 指令是使用以“t-”开头的 XML 属性来声明的。
最基本的指令是``t-name``,用于在模板文件中声明新模板:
<templates>
    <t t-name="HomePageTemplate">
        <div>This is some simple HTML</div>
    </t>
</templates>
t-name 获取正在定义的模板的名称,并声明可以使用 QWeb.render() 调用它。它只能在模板文件的顶层使用。
逃跑
t-esc 指令可用于输出文本:
<div>Hello <t t-esc="name"/></div>
它需要一个 Javascript 表达式进行计算,然后将表达式的结果进行 HTML 转义并插入到文档中。由于它是一个表达式,因此可以仅提供上面的变量名称,或者更复杂的表达式(例如计算):
<div><t t-esc="3+5"/></div>
或方法调用:
<div><t t-esc="name.toUpperCase()"/></div>
输出 HTML
要在正在呈现的页面中注入 HTML,请使用“t-raw`. Like ``t-esc`”,它接受任意 Javascript 表达式作为参数,但它不执行 HTML 转义步骤。
<div><t t-raw="name.link(user_account)"/></div>
危险
t-raw must not be used on any data which may contain non-escaped user-provided content as this leads to 跨站脚本 漏洞
条件句
QWeb 可以使用 t-if. The directive takes an arbitrary expression, if the expression is falsy (false, null, 0 或空字符串来拥有条件块)整个块被抑制,否则显示。
<div>
    <t t-if="true == true">
        true is true
    </t>
    <t t-if="true == false">
        true is not true
    </t>
</div>
注解
QWeb 没有“else”结构,使用第二个 t-if 并将原始条件反转。如果条件是复杂或昂贵的表达式,您可能希望将其存储在局部变量中。
迭代
要迭代列表,请使用 t-foreach and t-as. t-foreach takes an expression returning a list to iterate on t-as 在迭代过程中采用变量名称绑定到每个项目。
<div>
    <t t-foreach="names" t-as="name">
        <div>
            Hello <t t-esc="name"/>
        </div>
    </t>
</div>
注解
t-foreach 也可以与数字和对象(字典)一起使用
定义属性
QWeb 提供了两个相关指令来定义计算属性:t-att-name 和 t-attf-name。无论哪种情况,name 都是要创建的属性的名称(例如渲染后的``t-att-id`` defines the attribute id)。
t-att- 采用一个 JavaScript 表达式,其结果设置为属性的值,如果计算所有属性的值,则最有用:
<div>
    Input your name:
    <input type="text" t-att-value="defaultName"/>
</div>
t-attf- takes a format string. A format string is literal text with interpolation blocks inside, an interpolation block is a javascript expression between {{ and }},它将被表达式的结果替换。它对于部分文字和部分计算的属性最有用,例如类:
<div t-attf-class="container {{ left ? 'text-left' : '' }} {{ extra_class }}">
    insert content here
</div>
调用其他模板
模板可以分为子模板(为了简单性、可维护性、可重用性或避免过多的标记嵌套)。
这是使用“t-call”指令完成的,该指令采用要渲染的模板的名称:
<t t-name="A">
    <div class="i-am-a">
        <t t-call="B"/>
    </div>
</t>
<t t-name="B">
    <div class="i-am-b"/>
</t>
渲染 A 模板将导致:
<div class="i-am-a">
    <div class="i-am-b"/>
</div>
子模板继承其调用者的渲染上下文。
了解有关 QWeb 的更多信息
有关 QWeb 参考,请参阅 QWeb 模板。
锻炼
Exercise
QWeb 在小部件中的使用
创建一个小部件,其构造函数除了 parent: product_names and color 之外还采用两个参数。
product_names应该是一个字符串数组,每个字符串都是产品的名称coloris a string containing a color in CSS color format (ie:#000000表示黑色)。
小部件应一个一个地显示给定的产品名称,每个名称都在一个单独的框中,其背景颜色的值为“color` and a border. You should use QWeb to render the HTML. Any necessary CSS should be in ``oepetstore/static/src/css/petstore.css`”。
将“HomePage”中的小部件与六种产品一起使用。
小部件助手
Widget 的 jQuery 选择器
可以通过在小部件的 DOM 根上调用“find()”方法来选择小部件中的 DOM 元素:
this.$el.find("input.my_input")...
但由于这是一个常见操作,Widget() 通过 $() 方法提供了等效的快捷方式:
local.MyWidget = instance.Widget.extend({
    start: function() {
        this.$("input.my_input")...
    },
});
警告
全局 jQuery 函数 $() should never be used unless it is absolutely necessary: selection on a widget’s root are scoped to the widget and local to it, but selections with $() 对于页面/应用程序来说是全局的,并且可能与其他小部件和视图的部分匹配,从而导致奇怪或危险的副作用。由于小部件通常应该只作用于它拥有的 DOM 部分,因此没有理由进行全局选择。
更简单的 DOM 事件绑定
我们之前已经使用普通的 jQuery 事件处理程序(例如 .click() or .change())在小部件元素上绑定了 DOM 事件:
local.MyWidget = instance.Widget.extend({
    start: function() {
        var self = this;
        this.$(".my_button").click(function() {
            self.button_clicked();
        });
    },
    button_clicked: function() {
        ..
    },
});
虽然这有效,但存在一些问题:
这是相当冗长的
它不支持在运行时替换小部件的根元素,因为仅在运行“
start()”时(在小部件初始化期间)执行绑定它需要处理``this``绑定问题
因此,小部件通过 events:: 提供了 DOM 事件绑定的快捷方式
local.MyWidget = instance.Widget.extend({
    events: {
        "click .my_button": "button_clicked",
    },
    button_clicked: function() {
        ..
    }
});
events 是事件的对象(映射)到事件触发时要调用的函数或方法:
键是事件名称,可能使用 CSS 选择器进行细化,在这种情况下,仅当事件发生在选定的子元素上时,函数或方法才会运行:
clickwill handle all clicks within the widget, butclick .my_buttonwill only handle clicks in elements bearing themy_button类该值是触发事件时要执行的操作
它可以是一个函数:
events: {
    'click': function (e) { /* code here */ }
}
或对象方法的名称(参见上面的示例)。
无论哪种情况,事件的“
this`is the widget instance and the handler is given a single parameter, the `jQuery 事件对象”。
小部件事件和属性
活动
小部件提供了一个事件系统(与上述 DOM/jQuery 事件系统分开):小部件可以在其自身上触发事件,其他小部件(或其自身)可以绑定自身并侦听这些事件:
local.ConfirmWidget = instance.Widget.extend({
    events: {
        'click button.ok_button': function () {
            this.trigger('user_chose', true);
        },
        'click button.cancel_button': function () {
            this.trigger('user_chose', false);
        }
    },
    start: function() {
        this.$el.append("<div>Are you sure you want to perform this action?</div>" +
            "<button class='ok_button'>Ok</button>" +
            "<button class='cancel_button'>Cancel</button>");
    },
});
该小部件充当外观,将用户输入(通过 DOM 事件)转换为可记录的内部事件,父小部件可以将自己绑定到该内部事件。
trigger() 将要触发的事件的名称作为其第一个(强制)参数,任何其他参数都被视为事件数据并直接传递给侦听器。
然后我们可以设置一个父事件来实例化我们的通用小部件并使用 on():: 监听 user_chose` 事件
local.HomePage = instance.Widget.extend({
    start: function() {
        var widget = new local.ConfirmWidget(this);
        widget.on("user_chose", this, this.user_chose);
        widget.appendTo(this.$el);
    },
    user_chose: function(confirm) {
        if (confirm) {
            console.log("The user agreed to continue");
        } else {
            console.log("The user refused to continue");
        }
    },
});
on() 绑定一个要调用的函数,当由 event_name is. The func argument is the function to call and object 标识的事件是与该函数相关的对象(如果它是方法)时。绑定函数将使用 trigger() 的附加参数(如果有)进行调用。例子::
start: function() {
    var widget = ...
    widget.on("my_event", this, this.my_event_triggered);
    widget.trigger("my_event", 1, 2, 3);
},
my_event_triggered: function(a, b, c) {
    console.log(a, b, c);
    // will print "1 2 3"
}
注解
在其他小部件上触发事件通常是一个坏主意。该规则的主要例外是“odoo.web.bus”,它专门用于广播事件,其中任何小部件可能对整个 Odoo Web 应用程序感兴趣。
特性
属性与普通对象属性非常相似,因为它们允许在小部件实例上存储数据,但是它们具有附加功能,即在设置时触发事件:
start: function() {
    this.widget = ...
    this.widget.on("change:name", this, this.name_changed);
    this.widget.set("name", "Nicolas");
},
name_changed: function() {
    console.log("The new value of the property 'name' is", this.widget.get("name"));
}
set()设置属性的值并触发change:propname(其中 propname 是作为第一个参数传递给set()的属性名称)和changeget()检索属性的值。
锻炼
Exercise
小部件属性和事件
创建一个小部件``ColorInputWidget`` that will display 3 <input type="text">. Each of these <input> is dedicated to type a hexadecimal number from 00 to FF. When any of these <input> is modified by the user the widget must query the content of the three <input>, concatenate their values to have a complete CSS color code (ie: #00FF00) and put the result in a property named color. Please note the jQuery change() event that you can bind on any HTML <input> element and the val() method that can query the current value of that ``<input>``可能对您进行此练习有用。
然后,修改``HomePage`` widget to instantiate ColorInputWidget and display it. The HomePage widget should also display an empty rectangle. That rectangle must always, at any moment, have the same background color as the color in the color property of the ``ColorInputWidget``实例。
使用 QWeb 生成所有 HTML。
修改现有的小部件和类
Odoo Web 框架的类系统允许使用 include() 方法直接修改现有类:
var TestClass = instance.web.Class.extend({
    testMethod: function() {
        return "hello";
    },
});

TestClass.include({
    testMethod: function() {
        return this._super() + " world";
    },
});

console.log(new TestClass().testMethod());
// will print "hello world"
该系统类似于继承机制,不同之处在于它会就地更改目标类而不是创建新类。
在这种情况下,子类中的 this._super()` will call the original implementation of a method being replaced/redefined. If the class already had sub-classes, all calls to this._super() 将调用 include() 调用中定义的新实现。如果类(或其任何子类)的某些实例是在调用 include() 之前创建的,这也将起作用。
翻译
用 Python 和 JavaScript 代码翻译文本的过程非常相似。您可能已经注意到“petstore.js”文件开头的这些行:
var _t = instance.web._t,
    _lt = instance.web._lt;
这些行仅用于导入当前 JavaScript 模块中的翻译函数。它们的用法如下:
this.$el.text(_t("Hello user!"));
在 Odoo 中,翻译文件是通过扫描源代码自动生成的。检测调用某个函数的所有代码段,并将其内容添加到翻译文件中,然后将其发送给翻译人员。在 Python 中,该函数是“_()”。在 JavaScript 中,该函数是 _t() (也是 _lt())。
_t() 将返回为给定文本定义的翻译。如果没有为该文本定义翻译,它将按原样返回原始文本。
注解
要将用户提供的值注入可翻译字符串中,建议在翻译*之后*使用带有命名参数的 _.str.sprintf:
this.$el.text(_.str.sprintf(
    _t("Hello, %(user)s!"), {
    user: "Ed"
}));
这使得可翻译字符串对翻译人员来说更易读,并为他们提供了更大的灵活性来重新排序或忽略参数。
:func:`~odoo.web._lt`(“惰性翻译”)类似,但更复杂:它不是立即翻译其参数,而是返回一个对象,当该对象转换为字符串时,将执行翻译。
它用于在翻译系统初始化之前定义可翻译术语,例如类属性(因为在配置用户语言和下载翻译之前加载模块)。
与 Odoo 服务器通信
联系模特
Odoo 的大多数操作都涉及与实现业务关注的*模型*进行通信,然后这些模型将(可能)与某些存储引擎(通常是 PostgreSQL)进行交互。
尽管 jQuery 提供了用于网络交互的 $.ajax 函数,但与 Odoo 通信需要额外的元数据,这些元数据在每次调用之前的设置将是冗长且容易出错的。因此,Odoo Web 提供了更高级别的通信原语。
为了演示这一点,文件“petstore.py”已经包含一个带有示例方法的小模型:
class message_of_the_day(models.Model):
    _name = "oepetstore.message_of_the_day"

    @api.model
    def my_method(self):
        return {"hello": "world"}

    message = fields.Text(),
    color = fields.Char(size=20),
这声明了一个具有两个字段的模型,以及一个返回文字字典的方法“my_method()”。
这是一个调用 my_method() 并显示结果的示例小部件:
local.HomePage = instance.Widget.extend({
    start: function() {
        var self = this;
        var model = new instance.web.Model("oepetstore.message_of_the_day");
        model.call("my_method", {context: new instance.web.CompoundContext()}).then(function(result) {
            self.$el.append("<div>Hello " + result["hello"] + "</div>");
            // will show "Hello world" to the user
        });
    },
});
用于调用 Odoo 模型的类是 odoo.Model()。它使用 Odoo 模型的名称作为第一个参数(此处为“oepetstore.message_of_the_day”)进行实例化。
call() 可用于调用 Odoo 模型的任何(公共)方法。它采用以下位置参数:
name要调用的方法的名称,此处为“
my_method”args提供给该方法的 positional arguments 数组。由于该示例没有提供位置参数,因此未提供“
args”参数。这是另一个带有位置参数的示例:
@api.model
def my_method2(self, a, b, c): ...
model.call("my_method", [1, 2, 3], ...
// with this a=1, b=2 and c=3
kwargs要传递的 keyword arguments 映射。该示例提供了一个命名参数“
context”。@api.model def my_method2(self, a, b, c): ...
model.call("my_method", [], {a: 1, b: 2, c: 3, ...
// with this a=1, b=2 and c=3
call() 返回一个延迟解析,其中模型方法返回的值作为第一个参数。
复合上下文
上一节使用了“context”参数,该参数在方法调用中没有解释:
model.call("my_method", {context: new instance.web.CompoundContext()})
上下文就像一个“神奇”参数,Web 客户端在调用方法时始终会向服务器提供该参数。上下文是一个包含多个键的字典。最重要的关键之一是用户的语言,服务器使用它来翻译应用程序的所有消息。另一种是用户的时区,如果不同国家的人使用 Odoo,则用于正确计算日期和时间。
argument 在所有方法中都是必需的,否则可能会发生不好的事情(例如应用程序未正确翻译)。这就是为什么当您调用模型的方法时,您应该始终提供该参数。实现此目的的解决方案是使用 odoo.web.CompoundContext()。
CompoundContext() 是一个类,用于将用户的上下文(包括语言、时区等)传递到服务器,并向上下文添加新键(某些模型的方法使用添加到上下文的任意键)。它是通过向其构造函数提供任意数量的字典或其他 CompoundContext() 实例来创建的。它将在将所有这些上下文发送到服务器之前合并它们。
model.call("my_method", {context: new instance.web.CompoundContext({'new_key': 'key_value'})})
@api.model
def my_method(self):
    print(self.env.context)
    // will print: {'lang': 'en_US', 'new_key': 'key_value', 'tz': 'Europe/Brussels', 'uid': 1}
您可以在实例化 CompoundContext() 时添加的参数 context contains some keys that are related to the configuration of the current user in Odoo plus the new_key 键中看到字典。
查询
虽然 call() 足以与 Odoo 模型进行任何交互,但 Odoo Web 提供了一个帮助程序,可以更简单、更清晰地查询模型(根据各种条件获取记录):query(),它充当 search() 和 :read() 常见组合的快捷方式。它提供了更清晰的语法来搜索和读取模型:
model.query(['name', 'login', 'user_email', 'signature'])
     .filter([['active', '=', true], ['company_id', '=', main_company]])
     .limit(15)
     .all().then(function (users) {
    // do work with users records
});
相对::
model.call('search', [['active', '=', true], ['company_id', '=', main_company]], {limit: 15})
    .then(function (ids) {
        return model.call('read', [ids, ['name', 'login', 'user_email', 'signature']]);
    })
    .then(function (users) {
        // do work with users records
    });
query()采用可选的字段列表作为参数(如果未提供字段,则获取模型的所有字段)。它返回一个odoo.web.Query(),可以在执行之前进一步自定义Query()表示正在构建的查询。它是不可变的,自定义查询的方法实际上返回修改后的副本,因此可以并行使用原始版本和新版本。请参阅Query()了解其自定义选项。
当根据需要设置查询时,只需调用 all() 来执行它并返回一个延迟的结果。结果与 read() 相同,是一个字典数组,其中每个字典都是一个请求的记录,每个请求的字段都是一个字典键。
练习
Exercise
今日讯息
创建一个“MessageOfTheDay` widget displaying the last record of the ``oepetstore.message_of_the_day`”模型。小部件应该在显示后立即获取其记录。
在 Pet Store 主页中显示小部件。
Exercise
宠物玩具清单
创建一个显示 5 个玩具的 PetToysList 小部件(使用它们的名称和图像)。
宠物玩具不会存储在新模型中,而是存储在“product.product` using a special category Pet Toys. You can see the pre-generated toys and add new ones by going to . You will probably need to explore ``product.product`”中,以创建正确的域来仅选择宠物玩具。
在Odoo中,图像通常存储在编码为base64_的常规字段中,HTML支持直接使用:samp:`<img src=”data:{mime_type};base64,{base64_image_data}”/>`从base64显示图像
PetToysList widget should be displayed on the home page on the right of the MessageOfTheDay 小部件。您需要使用 CSS 进行一些布局才能实现此目的。
现有的网络组件
行动经理
在 Odoo 中,许多操作从 action 开始:打开菜单项(到视图)、打印报告……
操作是描述客户端应如何对内容的激活做出反应的数据。操作可以被存储(并通过模型读取),也可以动态生成(通过 JavaScript 代码在本地生成到客户端,或通过模型的方法远程生成)。
在 Odoo Web 中,负责处理和响应这些操作的组件是 Action Manager。
使用动作管理器
通过创建描述正确类型的 an action 的字典,并用它调用操作管理器实例,可以从 javascript 代码显式调用操作管理器。
do_action() 是 Widget() 查找“当前”操作管理器并执行操作的快捷方式:
instance.web.TestWidget = instance.Widget.extend({
    dispatch_to_new_action: function() {
        this.do_action({
            type: 'ir.actions.act_window',
            res_model: "product.product",
            res_id: 1,
            views: [[false, 'form']],
            target: 'current',
            context: {},
        });
    },
});
最常见的操作 type is ir.actions.act_window 为模型提供视图(以各种方式显示模型),其最常见的属性是:
res_model要在视图中显示的模型
- ``res_id``(可选)
对于表单视图,“
res_model”中预选的记录views列出通过该操作可用的视图。
[view_id, view_type],view_idcan either be the database identifier of a view of the right type, orfalse的列表,默认使用指定类型的视图。视图类型不能多次出现。默认情况下,该操作将打开列表的第一个视图。targetcurrent(the default) which replaces the “content” section of the web client by the action, ornew在对话框中打开操作。context要在操作中使用的其他上下文数据。
Exercise
跳转至产品
修改“PetToysList”组件,以便单击玩具会将主页替换为玩具的表单视图。
客户行动
在本指南中,我们使用了一个简单的“HomePage”小部件,当我们选择正确的菜单项时,Web 客户端会自动启动该小部件。但 Odoo 网络如何知道启动这个小部件呢?因为小部件被注册为*客户端操作*。
客户端操作(顾名思义)是一种几乎完全在客户端(在 Odoo Web 的 javascript 中)定义的操作类型。服务器只需发送一个操作标记(任意名称),并可以选择添加一些参数,但除此之外*一切*都由自定义客户端代码处理。
我们的小部件通过以下方式注册为客户端操作的处理程序:
instance.web.client_actions.add('petstore.homepage', 'instance.oepetstore.HomePage');
instance.web.client_actions 是一个 Registry() ,操作管理器在需要执行操作时会在其中查找客户端操作处理程序。 add() 的第一个参数是客户端操作的名称(标签),第二个参数是从 Odoo Web 客户端根目录到小部件的路径。
当必须执行客户端操作时,操作管理器在注册表中查找其标记,遍历指定的路径并显示它在末尾找到的小部件。
注解
客户端操作处理程序也可以是常规函数,在这种情况下,它将被调用,并且其结果(如果有)将被解释为要执行的下一个操作。
在服务器端,我们简单地定义了一个“ir.actions.client”操作:
<record id="action_home_page" model="ir.actions.client">
    <field name="tag">petstore.homepage</field>
</record>
和一个打开操作的菜单:
<menuitem id="home_page_petstore_menu" parent="petstore_menu"
          name="Home Page" action="action_home_page"/>
视图的架构
Odoo web 的大部分实用性(和复杂性)都在于视图。每种视图类型都是在客户端中显示模型的一种方式。
视图管理器
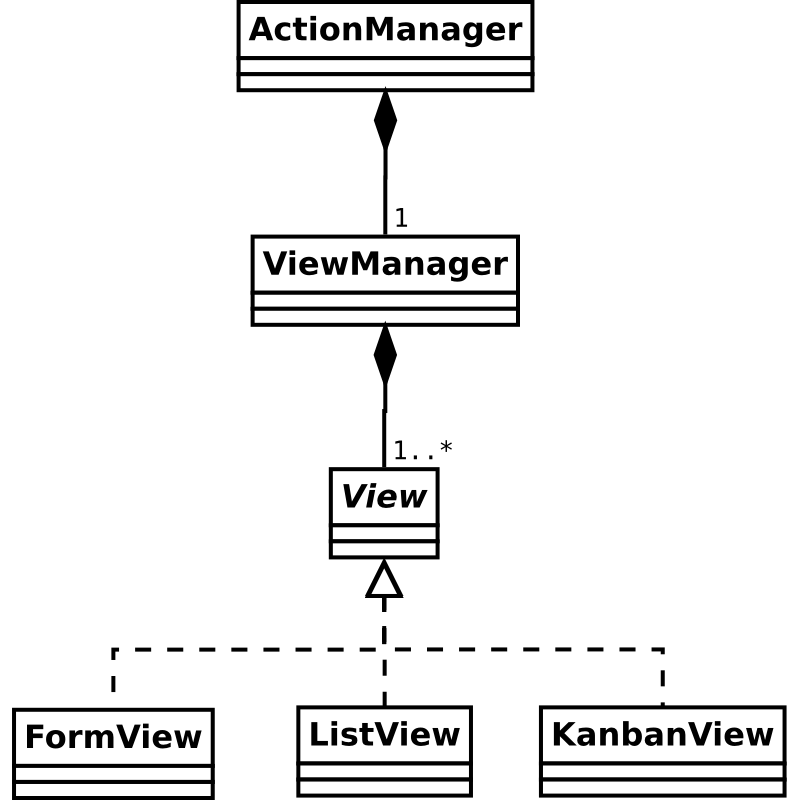
当``ActionManager`` instance receive an action of type ``ir.actions.act_window``时,它将视图本身的同步和处理委托给*视图管理器*,然后视图管理器将根据原始操作的要求设置一个或多个视图:
景色
大多数 Odoo views 是通过 odoo.web.View() 的子类实现的,它提供了一些用于处理事件和显示模型信息的通用基本结构。
搜索视图 被 Odoo 主框架视为一种视图类型,但由 Web 客户端单独处理(因为它是更永久的固定装置,并且可以与其他视图交互,而常规视图则不这样做)。
视图负责加载它自己的描述 XML(使用 fields_view_get)以及它需要的任何其他数据源。为此,视图提供了一个可选的视图标识符,设置为 view_id 属性。
视图还提供了一个 DataSet() 实例,它保存最必要的模型信息(模型名称和可能的各种记录 ID)。
视图可能还希望通过覆盖 do_search() 并根据需要更新其 DataSet() 来处理搜索查询。
表单视图字段
一个常见的需求是扩展 Web 表单视图以添加新的字段显示方式。
所有内置字段都有默认显示实现,可能需要新的表单小部件才能与新字段类型(例如 GIS 字段)正确交互,或提供与现有字段类型交互的新表示和方式(例如验证 Char 字段应包含电子邮件地址并将其显示为电子邮件链接)。
要显式指定应使用哪个表单小部件来显示字段,只需在视图的 XML 描述中使用“widget”属性:
<field name="contact_mail" widget="email"/>
注解
在表单视图的“查看”(只读)和“编辑”模式中使用相同的小部件,不可能在一个小部件中使用一个小部件,而在另一个小部件中使用另一个小部件
并且给定的字段(名称)不能在同一表单中多次使用
小部件可能会忽略表单视图的当前模式,并在视图和编辑模式下保持不变
在读取其 XML 描述并构造表示该描述的相应 HTML 后,表单视图将实例化字段。之后,表单视图将使用一些方法与字段对象进行通信。这些方法由“FieldInterface` interface. Almost all fields inherit the ``AbstractField`”抽象类定义。该类定义了大多数领域需要实现的一些默认机制。
以下是字段类的一些职责:
字段类必须显示并允许用户编辑字段的值。
它必须正确实现 Odoo 所有字段中可用的 3 个字段属性。
AbstractField类已经实现了一种动态计算这些属性值的算法(它们可以随时更改,因为它们的值会根据其他字段的值而变化)。它们的值存储在*小部件属性*中(小部件属性已在本指南前面部分中进行了解释)。每个字段类都有责任检查这些小部件属性并根据它们的值动态调整。以下是对每个属性的描述:required: The field must have a value before saving. Ifrequiredistrueand the field doesn’t have a value, the methodis_valid()of the field must returnfalse。invisible: When this istrue, the field must be invisible. TheAbstractField类已经具有适合大多数领域的此行为的基本实现。readonly: Whentrue, the field must not be editable by the user. Most fields in Odoo have a completely different behavior depending on the value ofreadonly. As example, theFieldChardisplays an HTML<input>当它是可编辑时,并且在只读时仅显示文本。这也意味着它需要更多的代码来实现一种行为,但这对于确保良好的用户体验是必要的。
字段有两个方法:
set_value()andget_value(), which are called by the form view to give it the value to display and get back the new value entered by the user. These methods must be able to handle the value as given by the Odoo server when aread()is performed on a model and give back a valid value for awrite(). Remember that the JavaScript/Python data types used to represent the values given byread()and given towrite()is not necessarily the same in Odoo. As example, when you read a many2one, it is always a tuple whose first value is the id of the pointed record and the second one is the name get (ie:(15, "Agrolait")). But when you write a many2one it must be a single integer, not a tuple anymore.AbstractFieldhas a default implementation of these methods that works well for simple data type and set a widget property namedvalue。
请注意,为了更好地理解如何实现字段,强烈建议您直接在 Odoo Web 客户端代码中查看 FieldInterface interface and the AbstractField 类的定义。
创建新类型的字段
在本部分中,我们将解释如何创建新类型的字段。这里的例子将重新实现``FieldChar``类并逐步解释每个部分。
简单只读字段
这是仅显示文本的第一个实现。用户将无法修改该字段的内容。
local.FieldChar2 = instance.web.form.AbstractField.extend({
    init: function() {
        this._super.apply(this, arguments);
        this.set("value", "");
    },
    render_value: function() {
        this.$el.text(this.get("value"));
    },
});

instance.web.form.widgets.add('char2', 'instance.oepetstore.FieldChar2');
在此示例中,我们在视图的 XML 声明中声明一个名为 FieldChar2 inheriting from AbstractField. We also register this class in the registry instance.web.form.widgets under the key char2. That will allow us to use this new field in any form view by specifying widget="char2" in the <field/> 标签的类。
在这个例子中,我们定义了一个方法:render_value(). All it does is display the widget property value. Those are two tools defined by the AbstractField class. As explained before, the form view will call the method set_value() of the field to set the value to display. This method already has a default implementation in AbstractField which simply sets the widget property value. AbstractField also watch the change:value event on itself and calls the render_value() when it occurs. So, ``render_value()``是在子类中实现的便捷方法,以便在每次字段值更改时执行某些操作。
在``init()`` method, we also define the default value of the field if none is specified by the form view (here we assume the default value of a ``char``字段中应该是一个空字符串)。
读写字段
只读字段仅显示内容且不允许用户修改它可能很有用,但 Odoo 中的大多数字段也允许编辑。这使得字段类更加复杂,主要是因为字段应该处理可编辑和不可编辑模式,这些模式通常完全不同(出于设计和可用性目的),并且字段必须能够随时在模式之间切换。
要了解当前字段应处于哪种模式,请使用“AbstractField` class sets a widget property named ``effective_readonly`”。该字段应该监视该小部件属性的变化并相应地显示正确的模式。例子::
local.FieldChar2 = instance.web.form.AbstractField.extend({
    init: function() {
        this._super.apply(this, arguments);
        this.set("value", "");
    },
    start: function() {
        this.on("change:effective_readonly", this, function() {
            this.display_field();
            this.render_value();
        });
        this.display_field();
        return this._super();
    },
    display_field: function() {
        var self = this;
        this.$el.html(QWeb.render("FieldChar2", {widget: this}));
        if (! this.get("effective_readonly")) {
            this.$("input").change(function() {
                self.internal_set_value(self.$("input").val());
            });
        }
    },
    render_value: function() {
        if (this.get("effective_readonly")) {
            this.$el.text(this.get("value"));
        } else {
            this.$("input").val(this.get("value"));
        }
    },
});

instance.web.form.widgets.add('char2', 'instance.oepetstore.FieldChar2');
<t t-name="FieldChar2">
    <div class="oe_field_char2">
        <t t-if="! widget.get('effective_readonly')">
            <input type="text"></input>
        </t>
    </div>
</t>
在``start()`` method (which is called immediately after a widget has been appended to the DOM), we bind on the event change:effective_readonly. That allows us to redisplay the field each time the widget property effective_readonly changes. This event handler will call display_field(), which is also called directly in start(). This display_field() was created specifically for this field, it’s not a method defined in ``AbstractField``或任何其他类别中。我们可以使用此方法根据当前模式显示字段的内容。
从现在开始,该字段的概念是典型的,除了需要进行大量验证才能了解“effective_readonly”属性的状态:
在用于显示小部件内容的 QWeb 模板中,如果我们处于读写模式,并且在只读模式下没有任何特别的内容,它会显示“
<input type="text" />”。在``display_field()`` method, we have to bind on the
changeevent of the<input type="text" />to know when the user has changed the value. When it happens, we call theinternal_set_value()method with the new value of the field. This is a convenience method provided by theAbstractFieldclass. That method will set a new value in thevalueproperty but will not trigger a call torender_value()(which is not necessary since the ``<input type=”text” />``中已经包含正确的值)。在``render_value()``中,我们使用完全不同的代码来显示字段的值,具体取决于我们处于只读模式还是读写模式。
Exercise
创建色域
创建 FieldColor class. The value of this field should be a string containing a color code like those used in CSS (example: #FF0000 for red). In read-only mode, this color field should display a little block whose color corresponds to the value of the field. In read-write mode, you should display an <input type="color" />. That type of <input /> 是一个 HTML5 组件,并不适用于所有浏览器,但在 Google Chrome 中运行良好。所以作为练习使用还是可以的。
您可以在“message_of_the_day` model for its field named color. As a bonus, you can change the MessageOfTheDay widget created in the previous part of this guide to display the message of the day with the background color indicated in the ``color`”字段的表单视图中使用该小部件。
表单视图自定义小部件
表单字段用于编辑单个字段,并且本质上链接到字段。因为这可能是限制性的,所以也可以创建不受如此限制并且与特定生命周期关系较少的“表单小部件”。
自定义表单小部件可以通过“widget”标签添加到表单视图中:
<widget type="xxx" />
这种类型的小部件将在创建 HTML 期间根据 XML 定义由表单视图简单地创建。它们具有与字段相同的属性(例如``effective_readonly`` property) but they are not assigned a precise field. And so they don’t have methods like get_value() and set_value(). They must inherit from the ``FormWidget``抽象类。
表单小部件可以通过侦听表单字段的更改并获取或更改其值来与表单字段进行交互。他们可以通过 field_manager 属性访问表单字段:
local.WidgetMultiplication = instance.web.form.FormWidget.extend({
    start: function() {
        this._super();
        this.field_manager.on("field_changed:integer_a", this, this.display_result);
        this.field_manager.on("field_changed:integer_b", this, this.display_result);
        this.display_result();
    },
    display_result: function() {
        var result = this.field_manager.get_field_value("integer_a") *
                     this.field_manager.get_field_value("integer_b");
        this.$el.text("a*b = " + result);
    }
});

instance.web.form.custom_widgets.add('multiplication', 'instance.oepetstore.WidgetMultiplication');
FormWidget 通常是 FormView() 本身,但其中使用的功能应限于 FieldManagerMixin() 定义的功能,最有用的是:
get_field_value(field_name)()返回字段的值。set_values(values)()设置多个字段值,采用“{field_name: value_to_set}”的映射每当名为“
field_name”的字段的值发生更改时,都会触发事件field_changed:field_name
Exercise
在 Google 地图上显示坐标
在``product.product``中添加两个字段来存储纬度和经度,然后创建一个新的表单小部件以在地图上显示产品原产地的纬度和经度
要显示地图,请使用 Google 地图的嵌入:
<iframe width="400" height="300" src="https://maps.google.com/?ie=UTF8&ll=XXX,YYY&output=embed">
</iframe>
其中“XXX` should be replaced by the latitude and ``YYY`”为经度。
在产品表单视图的新笔记本页面中显示两个位置字段和使用它们的地图小部件。
Exercise
获取当前坐标
添加一个将产品坐标重置为用户位置的按钮,您可以使用 javascript geolocation API 获取这些坐标。
现在我们想显示一个附加按钮来自动将坐标设置为当前用户的位置。
要获取用户的坐标,一种简单的方法是使用地理定位 JavaScript API。 See the online documentation to know how to use it。
另请注意,当表单视图处于只读模式时,用户不应单击该按钮。因此,这个自定义小部件应该正确处理“effective_readonly` property just like any field. One way to do this would be to make the button disappear when ``effective_readonly`”为真。